Prerequisites
This is a beginner-level tutorial for creating a simple web application, running on an HTTPS server exposed on your local machine, which reads from a MongoDB database and returns a single record as JSON.
You should be conceptually familiar with Docker, MongoDB / NoSQL databases and Node.js. You do not need any practical experience with any of these, as we will go through all the steps.
To follow this tutorial, please make sure you have installed Docker. You will also need OpenSSL, which for Windows users can be installed by downloading curl for Windows.
You will also need to generate a local certificate authority, server key and server certificate following the instructions from one of my previous tutorials.
You do not need MongoDB on the local system as we will run this via Docker, however you should have Node.js and NPM installed so we can initialize our project and install dependencies on the local machine - it is of course possible to do this via a Node container too, but for the sake of keeping the tutorial simple I've chosen to do it this way.
Create the project structure
Create a new directory and inside it, create an empty file called docker-compose.yml. We will be using Docker Compose to define our application stack, which will comprise
three containers; one based on Node.js for our Express web app, another for a MongoDB server and one more for a web-based Mongo GUI called Mongo Express.
Also create an empty sub-folder called app and inside this folder, an empty index.js file. Finally, create a sub-folder inside app called certs and copy the localhost.key and localhost.crt files you generated in to this sub-folder.
You should end up with a project directory looking like this:
|   docker-compose.yml
\---app
    |   index.js
    |
    +---certs
    |       localhost.crt
    |       localhost.key
Defining the database container
Open up docker-compose.yml in your choice of editor. This tutorial assumes a reasonably up-to-date version of Docker, you may need to adjust the version value depending on your version.
Let's start with the basics: the Compose version specification and a single volume, which we'll use to store our MongoDB databases.
version: "3.8"
volumes:
  mongodata:
Notice we do not define anything under the mongodata key in the YAML file. This will simply create (or use, if it already exists) a volume with this name. We'll attach it to a container in a moment.
Let's define the container for our database server. At the end of the YAML file, add in the following lines:
services:
  database:
    image: mongo
    container_name: mongo-database
    restart: always
    volumes:
      - "mongodata:/data/db"
    ports:
      - "27017:27017"
    environment:
      MONGO_INITDB_ROOT_USERNAME: root
      MONGO_INITDB_ROOT_PASSWORD: example
This will create a container called mongo-database using the latest mongo image from Docker Hub. We're mapping our mongodata volume to the /data/db directory inside the container. This is the default directory used by MongoDB to store data.
We are also mapping the container port 27017 to the same host port (the host port being the value on the left of that line).
Although it only defines a single service, your docker-compose.yml is now ready to use. If you jump to a command line / terminal and run docker compose up -d, Docker will pull the necessary image layers, build your container and start it
in the background. Run docker ps to confirm it is up and running.
Fire up your Mongo container. For the purposes of this tutorial, we're going to enter the container in a shell and create a new database and user for our project.
There are better ways of handling this for both dev and production, but the reason we're going to use the Mongo CLI inside the container is for two reasons; first, keeping the tutorial's service definitions as simple as possible, second because this process shows you how to enter a running container and poke around.
Check your container is up and running, then from your terminal run the following:
docker exec -ti mongo-database /bin/sh
You should now be in a shell inside the container. Enter the following command:
mongo -uroot -pexample
This will open an interactive prompt and you should see something like the following:
# mongo -uroot -pexample
MongoDB shell version v4.4.6
connecting to: mongodb://127.0.0.1:27017/?compressors=disabled&gssapiServiceName=mongodb
Implicit session: session { "id" : UUID("9c425f21-c4e8-43b3-a8a9-c54ad8da6303") }
MongoDB server version: 4.4.6
---
The server generated these startup warnings when booting:
        2021-05-25T17:20:26.527+00:00: Using the XFS filesystem is strongly recommended with the WiredTiger storage engine. See http://dochub.mongodb.org/core/prodnotes-filesystem
        2021-05-25T17:20:27.071+00:00: /sys/kernel/mm/transparent_hugepage/enabled is 'always'. We suggest setting it to 'never'
---
---
        Enable MongoDB's free cloud-based monitoring service, which will then receive and display
        metrics about your deployment (disk utilization, CPU, operation statistics, etc).

        The monitoring data will be available on a MongoDB website with a unique URL accessible to you
        and anyone you share the URL with. MongoDB may use this information to make product
        improvements and to suggest MongoDB products and deployment options to you.

        To enable free monitoring, run the following command: db.enableFreeMonitoring()
        To permanently disable this reminder, run the following command: db.disableFreeMonitoring()
---
>
Enter use myapp to create a new database, like so:
> use myapp
switched to db myapp
Now add a new collection people by inserting a sample document with the following data:
> db.people.insert({"firstName":"Dave","lastName":"Gebler","email":"me@davegebler.com","website":"https://davegebler.com"})
WriteResult({ "nInserted" : 1 })
Next, type in show dbs and you should see your new myapp database listed:
> show dbs
admin         0.000GB
config        0.000GB
local         0.000GB
myapp         0.000GB
Lastly, we are going to add a user to our database, which our Express/Node.js app will use to connect to and read from the database.
> db.createUser({user:"testdb", pwd:"testpwd", roles:[{role:"dbOwner",db:"myapp"}]})
Successfully added user: {
        "user" : "testdb",
        "roles" : [
                {
                        "role" : "dbOwner",
                        "db" : "myapp"
                }
        ]
}
Once you get to this point, enter exit to quit the Mongo CLI and exit again from the container shell to return to your host system.
Now run docker compose down to destroy the Mongo container (don't worry, the database and user we've added is safe in our separate mongodata volume).
Add Mongo Express for database webmin
It's great that we learned how to enter a container and use the Mongo CLI, but we'd probably prefer a nice web GUI to browse our database. Open up docker-compose.yml again and add a new service under the services key, just below the database service.
  mongo-express:
    image: mongo-express
    container_name: mongo-express
    restart: always
    ports:
      - "8081:8081"
    environment:
      ME_CONFIG_MONGODB_ADMINUSERNAME: root
      ME_CONFIG_MONGODB_ADMINPASSWORD: example
      ME_CONFIG_MONGODB_SERVER: mongo-database
Head back to the terminal and run docker compose up -d again. Once you've confirmed with docker ps that you now have two running containers, open up a browser and head to http://localhost:8081.
You should see the Mongo Express UI. You'll notice a few databases you didn't create; admin, config and local already exist. Ignore these and click on the myapp database.
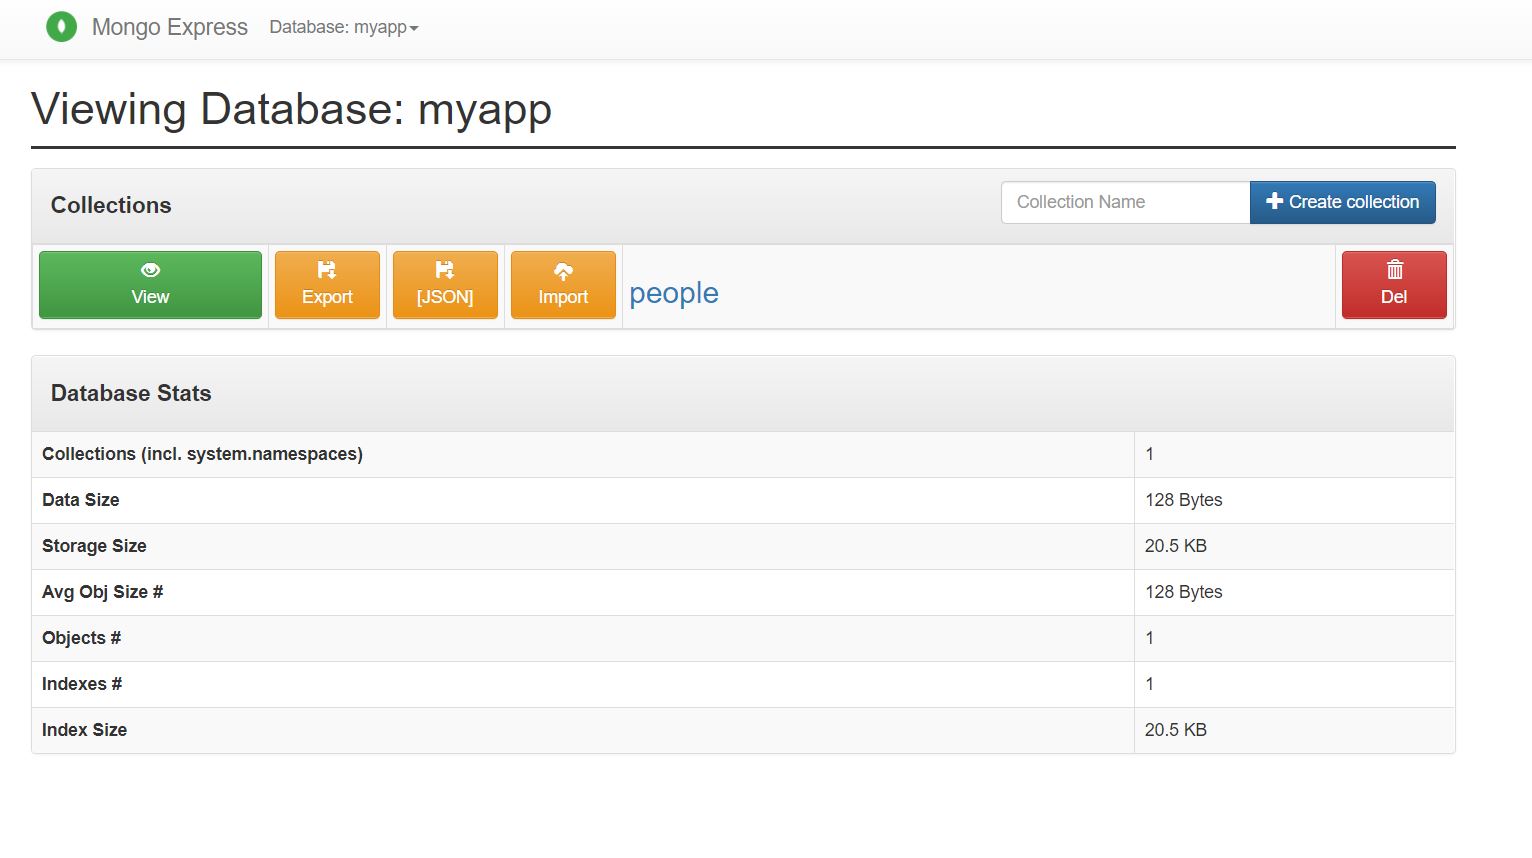
Click on the green View button and you should see the sample record we added to the people collection.
Define a web app container
Shut down your containers and open up docker-compose.yml once more. Add in a service definition for web like the following:
  web:
    image: node:14-alpine
    container_name: node-server
    restart: always
    user: "node"
    ports:
      - "9443:443"
    volumes:
      - "./app:/var/app/"
    working_dir: "/var/app"
    environment:
      NODE_ENV: dev
      DB_USER: testdb
      DB_PASSWORD: testpwd
      DB_NAME: myapp
    command: "./wait.sh mongo-database 27017 'node index.js'"
Notice under volumes, rather than a named volume like with our database container, we are using what's called a bind mount; we are mapping a directory on our host machine (our app subfolder) to a directory inside the container.
We also tell the container to use this directory, /var/app as the working directory when the container starts and specify a command to execute automatically when the container starts. This is a script we haven't written yet.
Also notice although we are going to run our app inside the container on port 443, on our host machine we will be accessing the web app on localhost:9443.
Write the command script
We could just run node index.js directly as the default command when our container starts, but this may pose a problem for our Express app. We're going to be reading from a MongoDB database in a different container (thus, from our application's point of view,
a database server at a different network location). It is therefore prudent for us to actually check our database server has fully initialized and is up and running before we try to start our web app.
To this end, we will quickly write a shell script which polls the mongo-database container for our database port, 27017, to be open. Once it is, we can be confident it's safe to fire up the web app.
Open up a text editor and create a new file wait.sh inside the app subdirectory. It should have the following contents:
#!/bin/sh
host="$1"
port="$2"
shift 2
cmd="$@"
until nc -z "$host" "$port"; do
  >&2 echo "Mongo is unavailable - sleeping"
  sleep 1
done
>&2 echo "Mongo started"
exec $cmd
This is really simple; we're just using netcat to scan the specified host and port until it becomes available and then execute the specified command. We supply these details as command line parameters. For production purposes, you may want to use something more sophisticated such as wait-for.
Build the web app
In your terminal, enter the project's app directory where the empty index.js resides and run the following commands:
npm init -y
npm install express mongodb
This will create a package.json file, package-lock.json and a new subdirectory node_modules containing our dependencies.
Now open up index.js in your editor and paste in the following:
const https = require('https');
const fs = require('fs');
const express = require('express');
const {MongoClient} = require('mongodb');
// Never hard-code your credentials, get them from config - in this case, the environment.
const uri = `mongodb://${process.env.DB_USER}:${process.env.DB_PASSWORD}@mongo-database/${process.env.DB_NAME}?retryWrites=true&writeConcern=majority`;

const app = express();
// Express by default exposes itself as your backend by sending the X-Powered-By header. Let's disable that, it's good security practice.
app.disable('x-powered-by');

var dbClient = null;
var server = null;

async function initDatabase() {
    try {
		const client = new MongoClient(uri, {
		  useNewUrlParser: true,
		  useUnifiedTopology: true,
		});

		await client.connect();
		return client;
	} catch (error) {
		console.error(error);
		process.exit(1);
	}
}

async function getPerson(name) {
	let database = dbClient.db(process.env.DB_NAME);
    let people = database.collection('people');
    let query = { firstName: {$regex : new RegExp(name, "i")} };
    return await people.findOne(query);
}

function doShutdown() {
	server.close(() => {
		console.log('HTTP server stopped');
		dbClient.close(() => {
			console.log('Database connection closed');
			console.log('Shutdown OK');
		});
	});
}

process.on('SIGTERM', doShutdown);
process.on('SIGINT', doShutdown);

app.get('/', (req, res) => {
	getPerson(req.query.name).then(
		(person) => res.send(person)
	);
});

initDatabase().then((client) => {
	console.log('Database initialized');
	dbClient = client;
	server = https.createServer({
		cert: fs.readFileSync('./certs/localhost.crt'),
		key: fs.readFileSync('./certs/localhost.key')
	}, app).listen(
		443, () => console.log('Server listening on https://localhost:443')
	);
});
Here we are defining a minimal Express app exposing a single endpoint which reads a name parameter from a query string and tries to find it in our Mongo database.
We pull the database name and credentials from the environment variables we defined in docker-compose.yml. When the application starts, we first make a call to the asynchronous initDatabase function, which obtains a
connection to the database and returns a client object. Only when the connection is available do we create the web server and attach it to the Express app object.
Putting it all together
On your terminal, run docker compose up -d again and docker ps to confirm your containers are running when it finishes. Now run docker logs node-server and you should see something like:
Mongo is unavailable - sleeping
Mongo started

> node-express@1.0.0 start /var/app
> node index.js

Database initialized
Server listening on https://localhost:443
Of course, we have mapped the container port to our host on 9443, so open your browser and visit https://localhost:9443 - unless you've imported your root certificate in to your system or browser trust store, you will get a warning
about a potentially insecure connection. It is safe to ignore it and proceed.
If all is well, you should something like the following:

Now try https://localhost:9443/?name=jim; you should be hit with a blank page (no surprise, there's no record in our database for Jim.
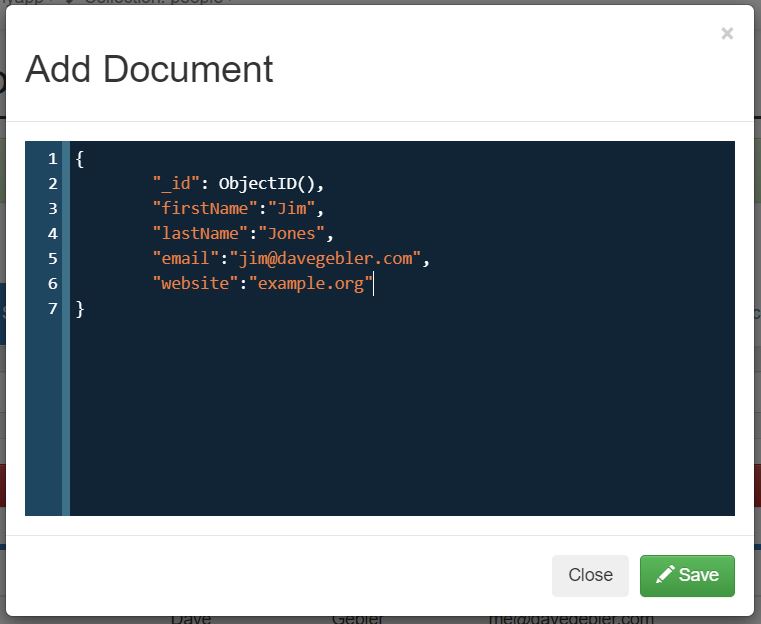
Open up Mongo Express and insert a Jim document in to the people collection:
Now refresh the browser page. You should see the new record.
Conclusion
Not only is Docker a fantastic way to manage repeatable, ephemeral dev environments, it's really easy using Compose to define entire application stacks and spin them up or down at the press of a button.
With its schemaless, document-oriented architecture, MongoDB is great for a variety of use cases but particularly in my experience used in conjunction with Node.js and Express for rapid prototyping of web services and APIs very early on, when our requirements are still uncertain or evolving. All we've done really is say what we want and let our tools do the rest.
The value of this can't be overstated; if you've followed this tutorial through to the end, you have written a fully functional, performant HTTPS server exposing a JSON API reading from a NoSQL data store in around 40 lines of JavaScript and the same again in declarative YAML, in probably around 10-15 minutes.
While this tutorial has cut a few corners and best practices in terms of preparing you for something you'd be ready to deploy to a larger scale production environment, it would surprisingly little further work to get it there.
I hope this has been useful and as always, feel free to get in touch with any comments or questions :smile:
You can download the code for this tutorial on my GitHub repository.
Comments (0)
No comments yet. Be the first to share your thoughts!
Leave a Comment