In this tutorial, I will be guiding you through the code to build your own OAuth2 server using the PHP League's OAuth2 Server library and their corresponding Symfony bundle.
The bundle isn't too well document as of the time of writing, so I thought this would be useful not only as a tutorial in creating a full server application and simple client demonstration, but also as a (hopefully) easy to understand reference for all the concepts involved.
What we'll be building
We'll be building a simple OAuth2 server that will allow users to log in and authorize a separate (i.e. third-party, client) application to access their data.
In the Symfony app which acts as the server, this will take the form of an access token being issued to the client app which can be used as part of an API request to authenticate as the user on the server, which will have additional roles granted inside their security token corresponding to the specific permissions they have authorized the client to access.
This means inside our server app, we can build API endpoints which are limited to requests with an access token which grants particular permissions.
The client app will be a simple PHP script that will allow the user to log in and then make an API request to the server app, which will return some data about the user.
The complete sample code for this tutorial is available on my GitHub and is conveniently Dockerized so you can run it locally without having to install any dependencies.
There is also a live demo available at https://davegebler.com/oauth2client
Just log in with the username me@davegebler.com and the password password and you'll be able to call the API on
https://auth.davegebler.com/api/test with your access token as a Bearer token in the Authorization header.
Before we get in to the code, let's take a closer look at OAuth2 and the flow we'll be using.
What is OAuth2?
OAuth2 is a standardised protocol for authorizing access to resources on a server on behalf of an owner.
Imagine you are a user of Application A. Application A holds some data about you. Maybe that's your name, email address, a photo, or maybe it's more sensitive data like your bank account details or your medical records.
Application B is a separate application that you also use. Application B wants to access some of the data that Application A holds about you, usually to save you needing to re-enter that same information in two different places, to give you convenience and a better experience.
In order to do this, Application B needs two things; your consent about exactly what data it can get, and a secure way to access the data once you have given it.
This is where OAuth 2 comes in. It replaces the original OAuth specification and is now the most widely used protocol for authorizing access to resources on a server.
A bit of terminology
OAuth2 is a protocol, which means it's a set of rules that define how two or more parties can interact with each other.
OAuth2 uses some particular terminology to describe the different pieces involved in this sharing of data.
A resource owner is you, the user. You are the person who owns some data that you want to share with another application. The data you own is called a resource.
The application that you want to share your data with is called a client. This is the application you will authorize to access your data. It is also the application that will request your consent to access your data.
The authorization server is the application which is able to grant access to your data and which the client will send you to in order to obtain your consent.
This may or may not be the same server as the resource server, which is the application that actually holds your data.
Your consent will be given to the authorization server, which will then issue an access token to the client.
The client will then use this access token to access your data on the resource server.
Your consent will be limited to the scope of the access token, which is the set of permissions that the client has been granted by you. These are the specific types of data you are agreeing that the client can access - for example, maybe the resource server is your bank, and you are happy to allow the client to access your name, email address and a list of your recent debit transactions, but not your other bank account details.
Finally, your consent will be revoked by the authorization server if you decide to withdraw it.
The OAuth2 flow
OAuth2 defines a specific flow for authorizing access to resources on a server. This flow is called the authorization code grant.
There are other flows defined in the OAuth2 specification, but this is the most common and the one we will be using in this tutorial.
It is also the only flow I've ever actually had to work with in the real world as a web developer, so I'm not going to go in to the others in too much detail here, but a quick overview:
Client credentials grant
This is the simplest flow. It is used when the client is acting on its own behalf, rather than on behalf of a user, i.e. when the client itself is the resource owner. This is used mostly in server-to-server communications.
Resource owner credentials grant
This is used when the client is acting on behalf of a user, but the user has given its full credentials to the client for future use. This is used mostly in mobile applications and should only be used where the user has a high degree of trust in the client app.
Implicit grant
This is a simplified version of the authorization code grant, which is used when the client is a web application that can't keep a secret token without exposing it to the wider world, such as a single-page JavaScript application with no server-side component. It is not recommended for use in most cases and should be avoided if possible.
Authorization code with PKCE (Proof Key for Code Exchange) grant
This is a version of the authorization code grant which is now the preferred alternative to the implicit grant. The difference is that the client app essentially generates a temporary secret in the form of a code verifier, which it then hashes to create a code challenge. This code challenge is sent to the authorization server, which then sends it back to the client app along with the authorization code. The client app then sends the authorization code and the code verifier to the authorization server. The authorization server then hashes the code verifier and compares it to the code challenge it received earlier. If they match, an access token can be issued.
Refresh token grant
This is used when the client has been issued an access token with a limited lifetime, and needs to be able to renew it without having to go through the full authorization code grant flow again.
The authorization code grant flow
The authorization code grant flow works like this:
- The client sends the user directly to the authorization server, in their browser, along with some information about itself and the permissions it wants to request.
- The user is presented with a login screen and asked to log in.
- The user is presented with a consent screen and asked to grant the client the permissions it has requested.
- The user is able to allow or deny this request.
- If the user denies the request, the authorization server will redirect the user back to the client with an error message.
- If the user allows the request, the authorization server will redirect the user back to the client with an authorization code.
- The client will then send this authorization code to the authorization server, along with its own secret token, to obtain an access token.
- The client will then use this access token to access the resource server on behalf of the user.
OAuth2 vs OpenID Connect
OAuth2 is a protocol for authorizing access to resources on a server. OpenID Connect is a protocol for authenticating users.
OpenID Connect (usually abbreviated to OIDC) is built on top of OAuth2. You can think of it as an opinionated use of and extension to the OAuth2 protocol, to enable authentication and user management.
Authorization vs authentication
You'll see these two terms crop up a lot in the world of computing.
Authentication is about establishing identity. It's about proving who you are. This doesn't necessarily mean your real-world identity; your identity in this context could be as simple as you are the person who has access to a particular email address.
Authorization is about what you're allowed to do. In most systems, you will need to be authenticated before you can be authorized to do anything.
Imagine I turn up at Number 10 Downing Street and I show the policeman at the gate my passport. The policeman might check my passport, look at me, be satisfied that my passport is genuine and that I am the person pictured on the passport. I am now authenticated; I have reasonably proved that I am Dave Gebler.
But does being Dave Gebler mean I am allowed to enter No. 10? No, because I am not authorized to do so.
That's authentication versus authorization.
Authentication with OIDC
So what OIDC does as a layer on top of OAuth2 is provide a standard set of rules by which a client application can use another application it trusts to authenticate a user, to provide data about that user's identity.
OIDC does this by providing a standard set of claims that the authentication server can provide to the client application.
Claims are simply pieces of information about the user. Some standard OIDC claims are:
sub- the user's unique identifier as held by the issuername- the user's full namegiven_name- the user's given namefamily_name- the user's family nameprofile- the user's profile URLpicture- the user's profile picture URLemail- the user's email addressemail_verified- whether the user's email address has been successfully verifiedphone_number- the user's phone numberphone_number_verified- whether the user's phone number has been successfully verified
There are others, but as we can see - each of the claims is a piece of information about who the user is.
The most common use case, then, of OIDC is to allow a user to use the data held about them by one application to create an account with and log in to another application.
In other words, your social sign in - the "Sign in with Google / Facebook / Twitter" buttons you see on so many websites - are all built on top of OIDC.
What is a JSON Web Token (JWT)?
Whereas OAuth2 returns an access token to a client, which is typically then used to access an API on the resource server, OIDC returns an ID token which directly contains identity information about the user.
Thus, the difference is a client is intended to parse and read an ID token directly.
OIDC uses a specific format called a JSON Web Token (JWTs) to encode this information.
A JWT is a string of text that is made up of three parts, separated by dots:
header.payload.signature
Each of these three parts is a standard JSON object.
The header contains information about the token itself, in particular the algorithm used to sign it.
The payload contains the actual data, as a set of claims.
The signature is a cryptographic signature of the header and payload, which is used to verify that the token is both authentic and has not been altered.
Each of these pieces is then base64 encoded.
Although OIDC specifically mandates the use of JWTs, OAuth2 does not - an access token can be any string of text, provided it uniquely identifies the user and the client. OAuth2 client applications should not rely on an access token being encoded in any particular format, and they should not try to decode or read it for any information.
That said, there is absolutely nothing wrong with providing an OAuth2 access token in JWT format; one reason you might want to do this is to store all necessary information about the user and scopes inside the access token itself, rather than having to store it in a database. The JWT will be signed with the private key of the authorization server and can be verified by the resource server using the public key.
We are not building a full OIDC server in this tutorial, but the OAuth2 server we are building will provide access tokens in JWT format, and we will use the signature of these tokens to verify that they are authentic in our sample client application. Most client applications will not need to do this and would treat the access token as an opaque string, but it is a useful exercise to understand how it works.
Thus, you can use what you learn here to go further with your implementation and issue ID tokens, or build a full OIDC server on top if you wish.
The decoded JWT our server will provide will look like this:
Header:
{
  "typ": "JWT",
  "alg": "RS256"
}
Payload:
{
  "aud": "testclient",
  "jti": "a4c3d9a9d6ac5ff1b5",
  "iat": 1662814887,
  "nbf": 1662814887,
  "exp": 1662818487,
  "sub": "ac4fbaf2-30a5-11ed-94e9-09ec9787bcf6",
  "scopes": [
    "blog_read",
    "profile",
    "email"
  ],
  "kid": "1",
  "custom": {
    "foo": "bar"
  }
}
Signature:
[Binary signature]
Prerequisites
To follow along with this tutorial, I will be assuming you are already reasonably familiar with Symfony.
The sample code I've provided is built on Symfony 6.1 and PHP 8.1, though I do provide a Docker Compose file to make it easy to get up and running.
If you're not using Docker, you'll need to have PHP 8.1 installed, along with the composer and symfony CLI tools.
Please also ensure you have OpenSSL installed on your system; we'll need this to generate
the private and public keypair used to sign our JWTs.
- Get Symfony CLI
- Get Composer
Set up the server application
We'll start by creating a new Symfony application to act as our OAuth2 server.
symfony new --webapp oauth2-server
This will create a new Symfony application in the oauth2-server directory.
We'll also need to install the PHP League OAuth2 Server Bundle, which provides a Symfony integration for the PHP League's OAuth2 Server library.
cd oauth2-server
composer require league/oauth2-server-bundle
Once your app is created, take a look at the default configuration. In my sample project, I've used SQLite as the database backend for simplicity's sake, but if you prefer to use MySQL / Postgres / whatever, feel free.
Generate the keys.
In the var directory of your Symfony project, create a new subdirectory called keys and run the following OpenSSL commands:
openssl genrsa -out var/keys/private.key
openssl rsa -in var/keys/private.key -pubout -out var/keys/public.key
Configure the OAuth2 server bundle
After installing, you will need to create a new configuration file in your project, under config/packages/league_oauth2_server.yaml
league_oauth2_server:
    authorization_server: # Required

        # Full path to the private key file.
        private_key: '%kernel.project_dir%/var/keys/private.key'

        # Passphrase of the private key, if any
        private_key_passphrase: null

        # The plain string or the ascii safe string used to create a Defuse\Crypto\Key to be used as an encryption key.
        # How to generate an encryption key: https://oauth2.thephpleague.com/installation/#string-password
        encryption_key:       ~ # Required

        # The type of value of 'encryption_key'
        encryption_key_type:  plain # One of "plain"; "defuse"

        # How long the issued access token should be valid for.
        # The value should be a valid interval: http://php.net/manual/en/dateinterval.construct.php#refsect1-dateinterval.construct-parameters
        access_token_ttl:     PT1H

        # How long the issued refresh token should be valid for.
        # The value should be a valid interval: http://php.net/manual/en/dateinterval.construct.php#refsect1-dateinterval.construct-parameters
        refresh_token_ttl:    P1M

        # How long the issued auth code should be valid for.
        # The value should be a valid interval: http://php.net/manual/en/dateinterval.construct.php#refsect1-dateinterval.construct-parameters
        auth_code_ttl:        PT10M

        # Whether to enable the client credentials grant
        enable_client_credentials_grant: true

        # Whether to enable the password grant
        enable_password_grant: true

        # Whether to enable the refresh token grant
        enable_refresh_token_grant: true

        # Whether to enable the authorization code grant
        enable_auth_code_grant: true

        # Whether to require code challenge for public clients for the auth code grant
        require_code_challenge_for_public_clients: true

        # Whether to enable access token saving to persistence layer (default to true)
        persist_access_token: true

    resource_server:      # Required

        # Full path to the public key file
        public_key: '%kernel.project_dir%/var/keys/public.key'

    scopes:
        # Scopes that you wish to utilize in your application.
        # This should be a simple array of strings.
        available:               ['email', 'profile', 'blog_read', 'blog_write']

        # Scopes that will be assigned when no scope given.
        # This should be a simple array of strings.
        default:                 ['email', 'profile']

    # Configures different persistence methods that can be used by the bundle for saving client and token data.
    # Only one persistence method can be configured at a time.
    persistence:          # Required
        doctrine:

            # Name of the entity manager that you wish to use for managing clients and tokens.
            entity_manager:       default
        in_memory:            ~

    # Set a custom prefix that replaces the default 'ROLE_OAUTH2_' role prefix
    role_prefix:          ROLE_OAUTH2_

    client:
        # Set a custom client class. Must be a League\Bundle\OAuth2ServerBundle\Model\Client
        classname:        League\Bundle\OAuth2ServerBundle\Model\Client
And import the bundle's routes inside config/routes.yaml
oauth2:
    resource: '@LeagueOAuth2ServerBundle/Resources/config/routes.php'
    type: php
Create our entities
We'll need to create a user entity to represent the users of our application.
php bin/console make:user
Create a User entity with email as the username and additionally include a uuid property of the
UUID type.
We're then going to make a couple of small changes so we can log in with email address, but also issue access tokens where the user's ID is a UUID.
In your UserRepository, ensure it implements UserLoaderInterface:
class UserRepository extends ServiceEntityRepository implements PasswordUpgraderInterface, UserLoaderInterface
And add the following method:
public function loadUserByIdentifier(string $identifier): ?User
{
    $entityManager = $this->getEntityManager();

    // Check if the identifier is an email address
    if (filter_var($identifier, FILTER_VALIDATE_EMAIL)) {
        return $this->findOneBy(['email' => $identifier]);
    }
    if (Uuid::isValid($identifier)) {
        return $this->findOneBy(['uuid' => Uuid::fromString($identifier)->toBinary()]);
    }
    return null;
}
Finally, in the User entity, add the following method:
public function getUserIdentifier(): string
{
    return $this->uuid->toRfc4122();
}
The bundle will include the entities we need to represent client applications, tokens and authorization codes, but there are still a couple more entities we want to create to save the consents granted by users to client applications, and to describe the applications in some meaningful way (we'll stick to a simple name for now).
Create two more entities:
php bin/console make:entity
Create a OAuth2ClientProfile entity with the following properties:
id- the primary key, an integer, auto incrementclient- a one-to-one relationship with theLeague\Bundle\OAuth2ServerBundle\Model\Cliententity- The referenced column name for this relation is
identifier.
- The referenced column name for this relation is
name- a stringdescription- a string or text
Now create a OAuth2UserConsent entity with the following properties:
id- the primary key, an integer, auto incrementuser- a many-to-one relationship with theApp\Entity\Userentityclient- a many-to-one relationship with theLeague\Bundle\OAuth2ServerBundle\Model\Cliententity- The referenced column name for this relation is
identifier.
- The referenced column name for this relation is
created- a datetimeexpires- a datetimescopes- a simple array
Override the bundle AccessToken entity
For this tutorial, we're going to include some custom fields in our access token JWTs.
To do this, we need to override the AccessToken entity provided by the bundle.
Create a new entity called AccessToken in the src/Entity directory with the following implementation:
<?php

namespace App\Entity;

use DateTimeImmutable;
use League\OAuth2\Server\Entities\AccessTokenEntityInterface;
use League\OAuth2\Server\Entities\Traits\AccessTokenTrait;
use League\OAuth2\Server\Entities\Traits\EntityTrait;
use League\OAuth2\Server\Entities\Traits\TokenEntityTrait;

final class AccessToken implements AccessTokenEntityInterface
{
   use AccessTokenTrait;
   use EntityTrait;
   use TokenEntityTrait;

   private function convertToJWT()
   {
       $this->initJwtConfiguration();

       return $this->jwtConfiguration->builder()
           ->permittedFor($this->getClient()->getIdentifier())
           ->identifiedBy($this->getIdentifier())
           ->issuedAt(new DateTimeImmutable())
           ->canOnlyBeUsedAfter(new DateTimeImmutable())
           ->expiresAt($this->getExpiryDateTime())
           ->relatedTo((string) $this->getUserIdentifier())
           ->withClaim('scopes', $this->getScopes())
           ->withClaim('kid', '1')
           ->withClaim('custom', ['foo' => 'bar'])
           ->getToken($this->jwtConfiguration->signer(), $this->jwtConfiguration->signingKey());
   }
}
What we've added here over the default implementation is the "kid" and "custom" fields.
The "custom" field is just an example of how we can add arbitrary data to the JWT. The "kid" field is a little more important - we'll be using this later to identify the key used to sign the JWT when we verify it. But for the tutorial, we'll just hardcode it as "1".
Next we'll create a custom repository to make use of this entity, which wraps the bundle repository:
src/Repository/AccessTokenRepository.php
<?php

namespace App\Repository;

use League\Bundle\OAuth2ServerBundle\Repository\AccessTokenRepository as BaseAccessTokenRepository;
use App\Entity\AccessToken as AccessTokenEntity;
use League\OAuth2\Server\Entities\AccessTokenEntityInterface;
use League\OAuth2\Server\Entities\ClientEntityInterface;
use League\OAuth2\Server\Repositories\AccessTokenRepositoryInterface;

final class AccessTokenRepository implements AccessTokenRepositoryInterface
{
    private BaseAccessTokenRepository $baseAccessTokenRepository;

    public function __construct(BaseAccessTokenRepository $baseAccessTokenRepository)
    {
        $this->baseAccessTokenRepository = $baseAccessTokenRepository;
    }

    /**
     * {@inheritdoc}
     */
    public function getNewToken(ClientEntityInterface $clientEntity, array $scopes, $userIdentifier = null)
    {
        /** @var int|string|null $userIdentifier */
        $accessToken = new AccessTokenEntity();
        $accessToken->setClient($clientEntity);
        $accessToken->setUserIdentifier($userIdentifier);

        foreach ($scopes as $scope) {
            $accessToken->addScope($scope);
        }

        return $accessToken;
    }

    /**
     * {@inheritdoc}
     */
    public function persistNewAccessToken(AccessTokenEntityInterface $accessTokenEntity): void
    {
        $this->baseAccessTokenRepository->persistNewAccessToken($accessTokenEntity);
    }

    /**
     * @param string $tokenId
     */
    public function revokeAccessToken($tokenId): void
    {
        $this->baseAccessTokenRepository->revokeAccessToken($tokenId);
    }

    /**
     * @param string $tokenId
     */
    public function isAccessTokenRevoked($tokenId): bool
    {
        return $this->baseAccessTokenRepository->isAccessTokenRevoked($tokenId);
    }
}
Configure the bundle to use our custom AccessToken entity
Now we need to tell our application to use our custom AccessToken entity.
Open the config/services.yaml file and add the following config under the services key:
League\OAuth2\Server\Repositories\AccessTokenRepositoryInterface:
		class: App\Repository\AccessTokenRepository
		decorates: 'League\Bundle\OAuth2ServerBundle\Repository\AccessTokenRepository'
Add an event subscriber to resolve an authorization code request
The bundle defines certain events which we can use to hook into the OAuth2 server's request handling.
We'll use the League\Bundle\OAuth2ServerBundle\Event\AuthorizationRequestResolveEvent event to resolve an authorization code request.
Create a new class called AuthorizationCodeSubscriber in the src/EventSubscriber directory with the following implementation:
<?php

namespace App\EventSubscriber;

use League\Bundle\OAuth2ServerBundle\Event\AuthorizationRequestResolveEvent;
use Symfony\Component\EventDispatcher\EventSubscriberInterface;
use Symfony\Component\HttpFoundation\RedirectResponse;
use Symfony\Component\HttpFoundation\RequestStack;
use Symfony\Component\Routing\Generator\UrlGeneratorInterface;
use Symfony\Component\Security\Core\Security;
use Symfony\Component\Security\Core\User\UserInterface;
use Symfony\Component\Security\Http\FirewallMapInterface;
use Symfony\Component\Security\Http\Util\TargetPathTrait;

class AuthorizationCodeSubscriber implements EventSubscriberInterface
{
    use TargetPathTrait;

    private Security $security;
    private UrlGeneratorInterface $urlGenerator;
    private RequestStack $requestStack;
    private $firewallName;

    public function __construct(Security $security, UrlGeneratorInterface $urlGenerator, RequestStack $requestStack, FirewallMapInterface $firewallMap)
    {
        $this->security = $security;
        $this->urlGenerator = $urlGenerator;
        $this->requestStack = $requestStack;
        $this->firewallName = $firewallMap->getFirewallConfig($requestStack->getCurrentRequest())->getName();
    }

    public function onLeagueOauth2ServerEventAuthorizationRequestResolve(AuthorizationRequestResolveEvent $event): void
    {
        $request = $this->requestStack->getCurrentRequest();
        $user = $this->security->getUser();
        $this->saveTargetPath($request->getSession(), $this->firewallName, $request->getUri());
        $response = new RedirectResponse($this->urlGenerator->generate('app_login'), 307);
        if ($user instanceof UserInterface) {
            if ($request->getSession()->get('consent_granted') !== null) {
                $event->resolveAuthorization($request->getSession()->get('consent_granted'));
                $request->getSession()->remove('consent_granted');
                return;
            }
            $response = new RedirectResponse($this->urlGenerator->generate('app_consent', $request->query->all()), 307);
        }
        $event->setResponse($response);
    }

    public static function getSubscribedEvents(): array
    {
        return [
            'league.oauth2_server.event.authorization_request_resolve' => 'onLeagueOauth2ServerEventAuthorizationRequestResolve',
        ];
    }
}
Now, whenever we get a hit for an auth code request, we'll check if the user is logged in. If they are, we'll check if they have already granted consent for the client and scopes requested. If they have, we'll resolve the request with the consent value. If they haven't, we'll redirect them to the consent page.
If the user is not logged in, we'll redirect them to the login page.
Build our login form controller
Now we need to build a controller to handle the login form. We'll just be building a standard Symfony login form here.
php bin/console make:controller Login
And enable it in the app configuration.
# config/packages/security.yaml
security:
    # ...

    firewalls:
        main:
            # ...
            form_login:
                login_path: app_login
                check_path: app_login
                enable_csrf: true
Then add the following to the src/Controller/LoginController.php file, inside your app_login route function:
#[Route('/login', name: 'app_login')]
public function index(AuthenticationUtils $authenticationUtils): Response
{
    if ($this->getUser()) {
        return $this->redirectToRoute('app_index');
    }
    $error = $authenticationUtils->getLastAuthenticationError();
    $lastUsername = $authenticationUtils->getLastUsername();
    return $this->render('login/index.html.twig', [
        'controller_name' => 'LoginController',
        'error' => $error,
        'last_username' => $lastUsername,
    ]);
}
We'll add another endpoint inside this controller to handle the consent form a bit later.
How you style your login form is up to you; see my sample app for an example. Don't forget to add the CSRF token to your form!
<input type="hidden" name="_csrf_token" value="{{ csrf_token('authenticate') }}">
Create the sample API and JWKS endpoints
Next step is to create and Index controller.
The Index controller is just a convenient place we're going to stick a logged-in homepage, a sample API endpoint which will be restricted to users with a certain OAuth2 scope, and another API endpoint which will be available publicly. This last one will expose something called a JSON Web Key Set (JWKS) which we'll use to verify the JWTs we get back from the OAuth2 server.
This is not something we need to do strictly for OAuth2 purposes, but it shows how we could use this system to issue ID tokens or other tokens containing information we want the client to be able to read and verify.
php bin/console make:controller Index
Then add the following to the src/Controller/IndexController.php file:
#[Route('/api/test', name: 'app_api_test')]
public function apiTest(): Response
{
    /** @var User $user */
    $user = $this->getUser();
    return $this->json([
        'message' => 'You successfully authenticated!',
        'email' => $user->getEmail(),
    ]);
}
This is the endpoint we'll call from our client app with our access token.
Next, add another endpoint to read our server's public key and encode the information about it into a JSON response to create a JWKS.
#[Route('.well-known/jwks.json', name: 'app_jwks', methods: ['GET'])]
public function jwks(): Response
{
    // Load the public key from the filesystem and use OpenSSL to parse it.
    $kernelDirectory = $this->getParameter('kernel.project_dir');
    $publicKey = openssl_pkey_get_public(file_get_contents($kernelDirectory . '/var/keys/public.key'));
    $details = openssl_pkey_get_details($publicKey);
    $jwks = [
        'keys' => [
            [
                'kty' => 'RSA',
                'alg' => 'RS256',
                'use' => 'sig',
                'kid' => '1',
                'n' => strtr(rtrim(base64_encode($details['rsa']['n']), '='), '+/', '-_'),
                'e' => strtr(rtrim(base64_encode($details['rsa']['e']), '='), '+/', '-_'),
            ],
        ],
    ];
    return $this->json($jwks);
}
Create the consent page controller
Now we need to create a controller endpoint to handle the consent page.
For the purposes of the tutorial, we're just going to stick all our logic for this inside a
new endpoint in the existing LoginController (since the consent page is part of the authorization flow).
There's a fair bit we want to handle here:
- Get the client_id from the request query and check it's valid
- Find the client in the database
- Find the corresponding client profile in the database, so we can display the app name / description / whatever
- Get the scopes from the request query and check they're valid scopes for the client
- Check if the user has already granted consent for this client and scopes
- If they have, redirect them back to the OAuth2 server with the consent value
- If they haven't, display the consent page
- If the user has consented to some but not all the scopes requested, display the consent page with the consented scopes listed
- If the user submits the consent page, save their consents and redirect them back to the OAuth2 server with the consent value
In the real world, we would factor this out in to some smaller services and aim to keep our controller as slim as possible.
But for our tutorial, in your src/Controller/LoginController.php file, add the following function for the app_consent route:
#[Route('/consent', name: 'app_consent', methods: ['GET', 'POST'])]
public function consent(Request $request): Response
{
    $clientId = $request->query->get('client_id');
    if (!$clientId || !ctype_alnum($clientId) || !$this->getUser()) {
        return $this->redirectToRoute('app_index');
    }
    $appClient = $this->em->getRepository(Client::class)->findOneBy(['identifier' => $clientId]);
    if (!$appClient) {
        return $this->redirectToRoute('app_index');
    }
    $appProfile = $this->em->getRepository(OAuth2ClientProfile::class)->findOneBy(['client' => $appClient]);
    $appName = $appProfile->getName();

    // Get the client scopes
    $requestedScopes = explode(' ', $request->query->get('scope'));
    // Get the client scopes in the database
    $clientScopes = $appClient->getScopes();

    // Check all requested scopes are in the client scopes
    if (count(array_diff($requestedScopes, $clientScopes)) > 0) {
        return $this->redirectToRoute('app_index');
    }

    // Check if the user has already consented to the scopes
    /** @var User $user */
    $user = $this->getUser();
    $userConsents = $user->getOAuth2UserConsents()->filter(
        fn (OAuth2UserConsent $consent) => $consent->getClient() === $appClient
    )->first() ?: null;
    $userScopes = $userConsents?->getScopes() ?? [];
    $hasExistingScopes = count($userScopes) > 0;

    // If user has already consented to the scopes, give consent
    if (count(array_diff($requestedScopes, $userScopes)) === 0) {
        $request->getSession()->set('consent_granted', true);
        return $this->redirectToRoute('oauth2_authorize', $request->query->all());
    }

    // Remove the scopes to which the user has already consented
    $requestedScopes = array_diff($requestedScopes, $userScopes);

    // Map the requested scopes to scope names
    $scopeNames = [
        'profile' => 'Your profile',
        'email' => 'Your email address',
        'blog_read' => 'Your blog posts (read)',
        'blog_write' => 'Your blog posts (write)',
    ];

    // Get all the scope names in the requested scopes.
    $requestedScopeNames = array_map(fn($scope) => $scopeNames[$scope], $requestedScopes);
    $existingScopes = array_map(fn($scope) => $scopeNames[$scope], $userScopes);

    if ($request->isMethod('POST')) {
        if ($request->request->get('consent') === 'yes') {
            $request->getSession()->set('consent_granted', true);
            // Add the requested scopes to the user's scopes
            $consents = $userConsents ?? new OAuth2UserConsent();;
            $consents->setScopes(array_merge($requestedScopes, $userScopes));
            $consents->setClient($appClient);
            $consents->setCreated(new \DateTimeImmutable());
            $consents->setExpires(new \DateTimeImmutable('+30 days'));
            $consents->setIpAddress($request->getClientIp());
            $user->addOAuth2UserConsent($consents);
            $this->em->getManager()->persist($consents);
            $this->em->getManager()->flush();
        }
        if ($request->request->get('consent') === 'no') {
            $request->getSession()->set('consent_granted', false);
        }
        return $this->redirectToRoute('oauth2_authorize', $request->query->all());
    }
    return $this->render('login/consent.html.twig', [
        'app_name' => $appName,
        'scopes' => $requestedScopeNames,
        'has_existing_scopes' => $hasExistingScopes,
        'existing_scopes' => $existingScopes,
    ]);
}
And create the consent.html.twig template inside the templates/login directory.
The template should contain a form to submit consent value and show any existing consents as well as
the list of requested consents.
A full example can be found in the sample app on my GitHub.
Configure the firewall
We just need to make a few adjustments to our security.yaml file to make sure the endpoints we've created
are exposed or protected as appropriate.
firewalls:
  api:
    pattern: ^/api
    security: true
    stateless: true
    oauth2: true
# ...
access_control:
  - { path: ^/authorize, roles: PUBLIC_ACCESS }
  - { path: ^/login, role: PUBLIC_ACCESS }
  - { path: ^/token, role: PUBLIC_ACCESS }
  - { path: ^/.well-known, roles: PUBLIC_ACCESS }
  - { path: ^/api/test, role: ROLE_OAUTH2_EMAIL }
  - { path: ^/, role: ROLE_USER }
Our client application
Now that we have our OAuth2 server, we can create a client application to test it out.
This can take any form you like, for my sample I've built a simple, single file script which you can
find in the client subdirectory of the project.
When a user wants to log in via OAuth2, they are first redirected to the /authorize endpoint of the
server, with the following request parameters:
client_id- The client identifierredirect_uri- The URI to redirect the user to after they have logged in / given consentresponse_type- The response type, which should becodescope- The scopes to request, which for my sample app areprofile email blog_read blog_write.
The client will also have a /callback endpoint which is what we'll use as the redirect_uri for our
test client. This endpoint will receive the code parameter which we can use to request an access token.
We do this by calling the /token endpoint of the server, with the following request parameters:
client_id- The client identifierclient_secret- The client secretredirect_uri- The URI to redirect the user to after they have logged in / given consentgrant_type- The grant type, which should beauthorization_codecode- The code received from the/authorizeendpoint
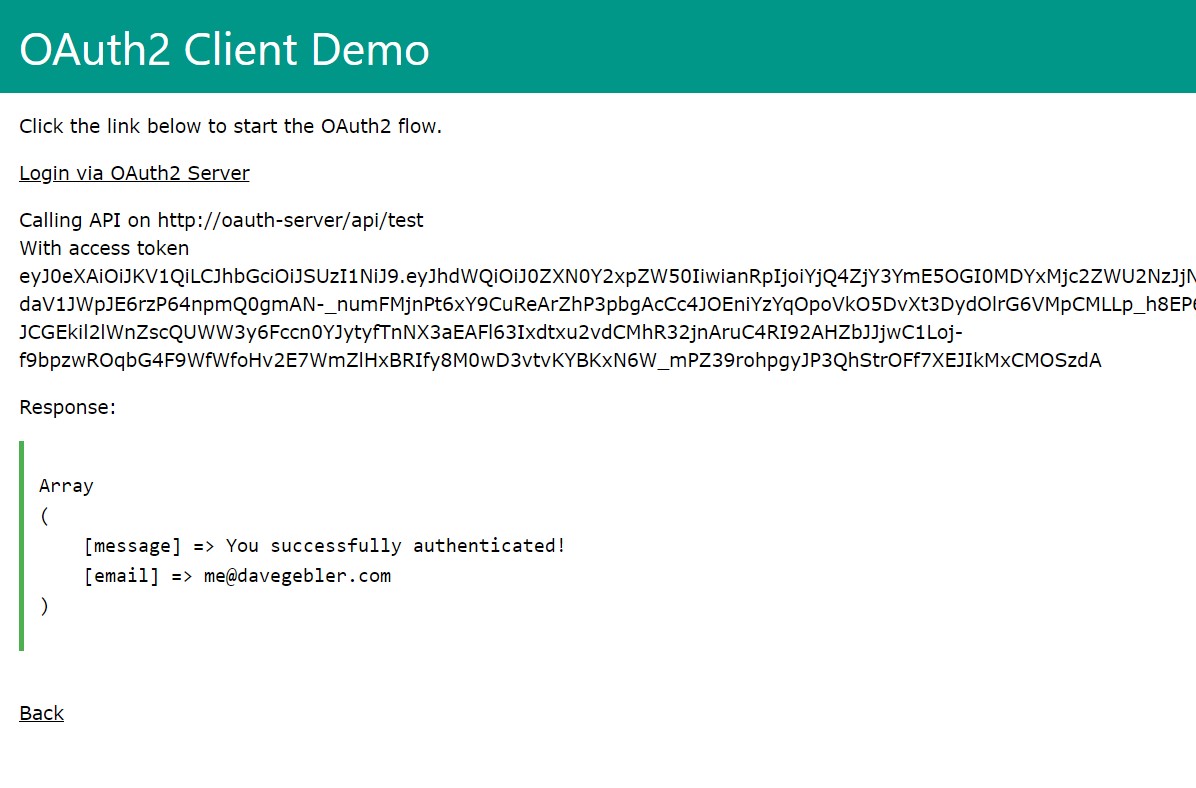
The server will then return an access token, which we can use to make requests to the /api/test endpoint.
In my sample client on the GitHub repo, I've also obtained the JWKS we exposed from the auth server's /.well-known/jwks.json endpoint and used it in conjunction with a JWT parsing library to verify the authenticity of the returned token.
Create a client on the OAuth2 server
Before we can use our client application, we need to create a client on the OAuth2 server. We will also need to create a user account to log in with.
In my full sample, I've provided a bootstrap command in the server application to do this.
php bin/console app:bootstrap
This will create a client with the following details:
- Client ID:
testclient - Client Secret:
testpass - Redirect URI:
http://localhost:8080/callback - Scopes:
profile email blog_read blog_write - Grants:
authorization_code refresh_token
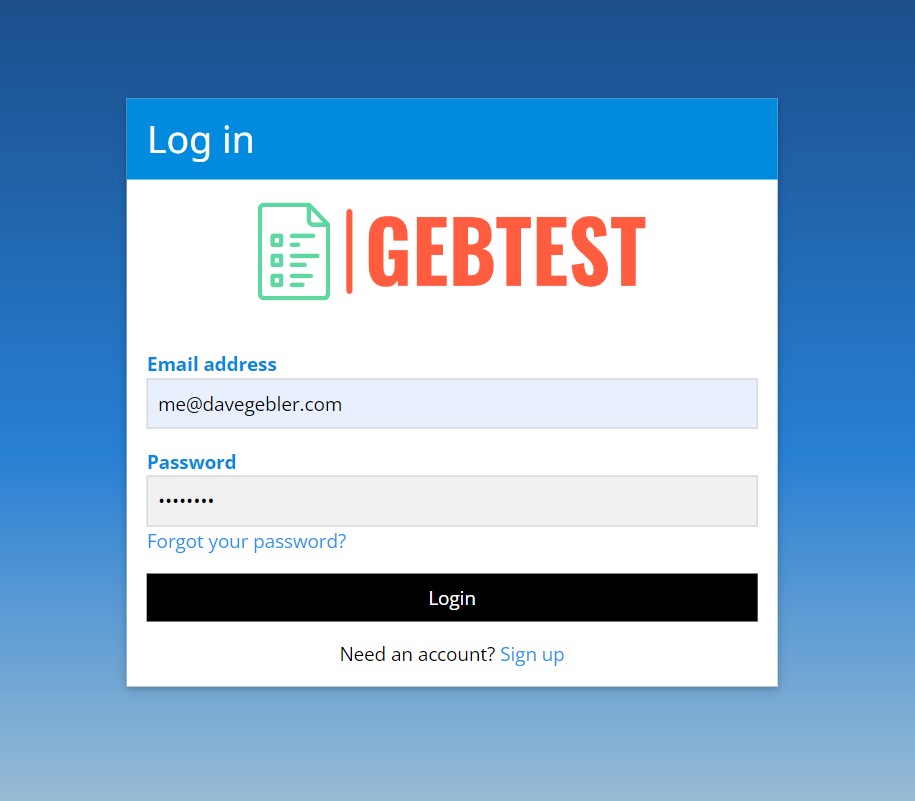
It will also create a user with the following details:
- Username:
me@davegebler.com - Password:
password
The League OAuth2 Server bundle also provides some console commands to help you create, update and delete clients, which you can read about in their documentation.
php bin/console league:oauth2-server:create-clientphp bin/console league:oauth2-server:update-clientphp bin/console league:oauth2-server:delete-clientphp bin/console league:oauth2-server:list-clients
Try it out
Now we can try out our OAuth2 server and client application.
Instructions for spinning up the server and client can be found in the README of the sample project on the GitHub repo, or if you've built your own project following this tutorial, you should run your server app either through the Symfony built-in web server or a local web server like Apache or Nginx, and run the client script either using the PHP built-in web server or your local web server.
# From project directory
symfony server:start -d --port=8000
# From client/ directory
php -S localhost:8080 app.php
First we want to hit our client app in the browser, by visiting http://localhost:8080.
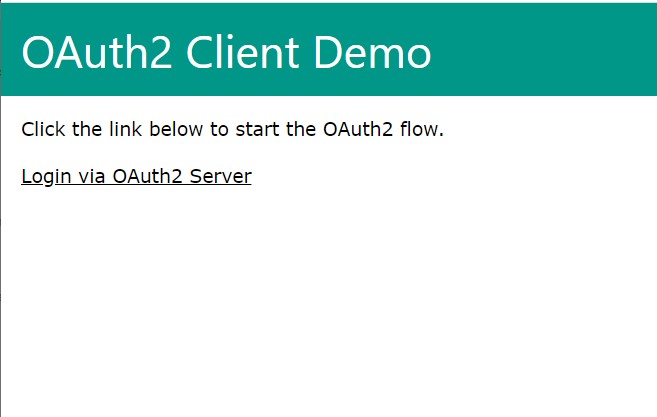
...which will take us to the server login page, because we are not already logged in.
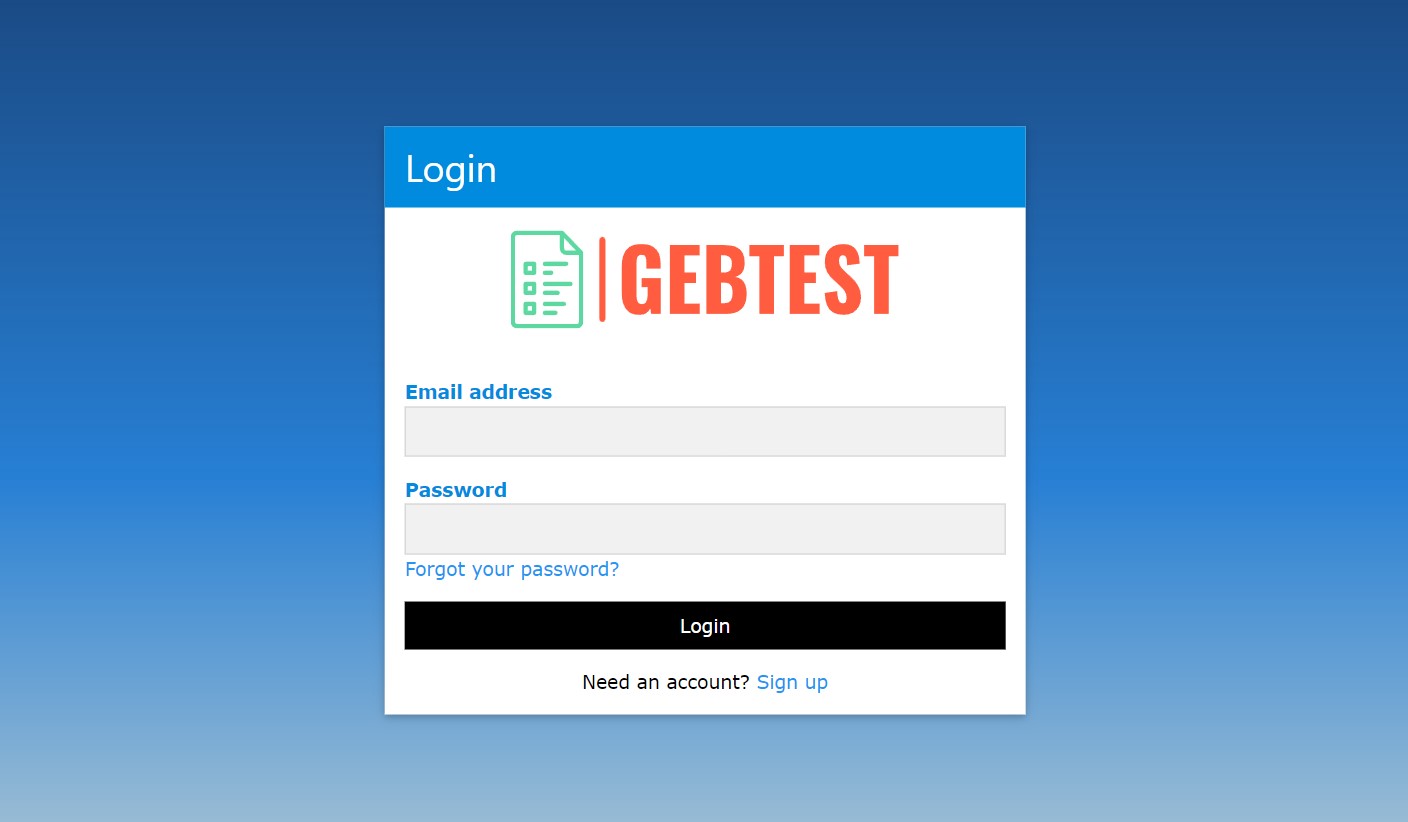
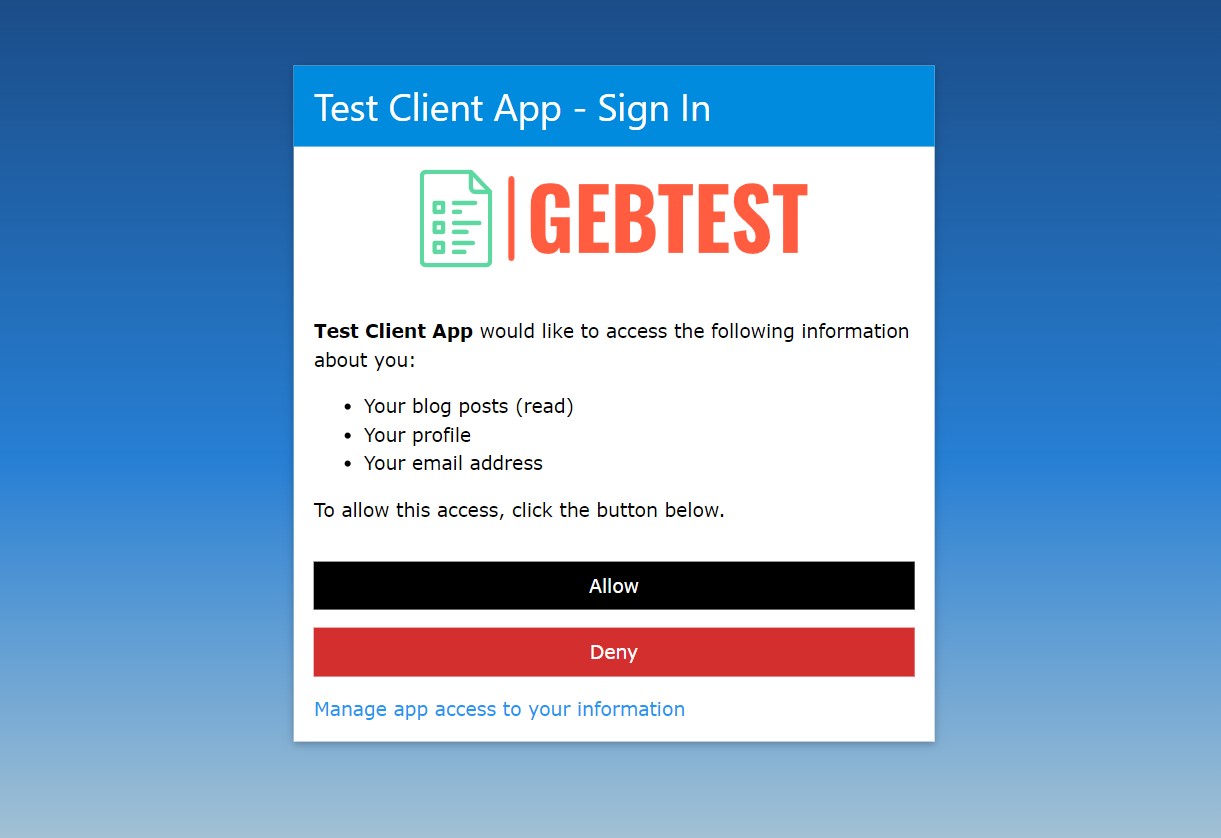
...we log in with the user we created earlier.
...and we are redirected to the consent page
...where we can see the scopes we've requested, and any existing scopes we've already given consent for. We accept the consent and are redirected back to the client app.
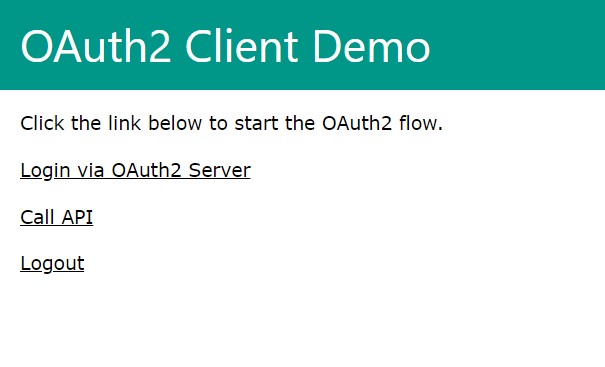
...and now we can call the /api/test endpoint of the server, which will return the user's profile.
Wrapping up
My sample app is missing a few key pieces you would want to include in a real-world OAuth2 server.
- A way for new users to register.
- A way for users to reset their password.
- A way for users to manage and revoke existing consents.
These pieces are all trivial enough for anyone familiar with Symfony to implement, so I've left them out of the tutorial.
In addition, although the sample client app stores the access token to make API requests, it doesn't have any logic to refresh the token when it expires. Our OAuth2 server, however, does include a refresh token grant type, so you could easily add this to your client app.
This was quite a long post to write, hope you enjoyed it and found it useful!
Comments (22)
re the league bundle install. It'll fail, however in the setup instructions on the league github pages it specifies a reference file to use as a default.
Editor's reply: You're absolutely right, I forgot when I got round to doing the write-up the bundle installation doesn't create this config for you, I've updated the tutorial steps to include the full file and importing the routes.
Hi Dave, thank you for this post! This is just what I needed to understand better the OAuth2 concepts and start coding my first Resource Owner App. I'm using your code and I get an error when I should be redirected to the client app : _route 'oauth2_authorize' does not exist_ Could you please tell me if I did something wrong? I had to adapt your code because I'm using php 7, but I don't think this is related. Thanks
Editor's reply: The League bundle requires PHP >= 7.2 so if you're using at least that version, you shouldn't have any issues. The
oauth2\_authorizeroute is defined in the bundle () so I'd suggest checking if you've correctly installed and enabled the bundle, then that you've imported the required routes in your project'sconfig/routes.yaml() and that you can get some response from the/authorizeendpoint of your app. The code sample I've provided for this tutorial is Dockerized so you can always spin up the containers which run PHP 8.1, without interfering with your local environment. Finally, you can try running the php bin/console debug:router command in your project to see what routes exist.Hi again, It looks like DaveVaughan had the same problems than me with the routes, I saw your update about importing OAuth2 bundle's route and everything is working fine now :) Thanks again for sharing this!
I encountered a few issues/missing stuff when working with your post, that you might want to check out:
Symfony app creation : You might advise to use your composer.json or indicate that symfony/uid is required
league_oauth2_server.yaml, security.yaml : I had to copy your demo files, some configs are missing in your post.
Entities creation :OAuth2UserConsent : missing property ipAddress in your post
missing function loadUserByUsername dans UserRepo
Editor's reply: Thanks Pierre, the null-safe operator (?->) is a PHP 8 feature, one of the many cool new things you can use if you upgrade! I know the tutorial doesn't quite cover everything I did for my specific sample project, that's why I provide the complete code too - it's already a huge, long blog post and I have to be selective about what I cover in what detail. The main thing is people can use the exploration of the bundle setup here to build their own project with their own requirements, where things like entities may look a bit different to what I did. Glad you've got everything working anyway and thanks for your feedback!
Hi Dave, If my client app has its own users' table and I want to authenticate the user when the client app receives the access token from the server app, would you recommend using another bundle (which one?) or would you keep things simple by just adding the users'id in the JWT and using Symfony's Authenticator to log in the user into the client app? Thanks for your advices. I don't know if what I want to do involves building or not an OIDC layer on top of the OAuth flow.
Editor's reply: Hi Pierre, there's a couple things to consider here. So strictly speaking, OAuth2 specifies that a client gets an opaque access token. In other words, if you are building a client following OAuth2 flow to obtain a token (and the only thing you know about the authorization server is it's OAuth2 compliant), you should not rely on the token being any particular format or containing any readable information, the only thing you should do with it is pass it to the resource server as a Bearer token to access data in the scopes which have been granted.
One way of using a standard OAuth2 grant to log a user in on the client side would be to request a scope which gave you access to an API endpoint which provided enough information about a user to uniquely identify them.
That said, if your client is using an authorization server that you've built and you control, of course it's up to you what the token looks like and you absolutely can return a JWT which also functions as an ID token with information inside that you could use to identify a user and log them in. Alternatively, you could intercept the
TokenRequestResolveEventto modify the response from the auth server and include a separate ID token (as a JWT or whatever else), or follow some other route to build an OIDC or OIDC-like layer on top of what we've done in this tutorial.So it's up to you really - if you control the OAuth2 server(s) in addition to the client, you have a lot of flexibility, there's no hard rules on what you must or must not do. You're more going to be concerned about maintaining something strictly compliant with the standardised spec if you're providing other clients you don't control access to your servers. And even then, there's nothing to say you can't provide a structured access token with information inside, only that clients shouldn't rely on you doing so.
Dave,
Thanks a lot for your explanation. I will carefully think about it while going further with my project.
I had a look at Phpleague OAuth 2.0 Server documentation, and I am very glad you wrote this post, because it would have been too scarce for me to understand how it works without your help.
Hi,
Thanks for this post. I tried to Override the bundle AccessToken entity like you wrote, overriding the convertToJWT function, but is not workable. I added the lines in to services.yaml, but its like skip it and go to the base method. Do you have some idea why its happening?
Thanks a lot! Kind Regards
Editor's reply: Hi, you may also need to override the
AccessTokenRepository, see sorry if I missed that out of my write-up! I have updated the tutorial to make the instructions more clear.Hi Dave,
I discovered your update for AccessTokenRepository and it's working fine. Now I would like to send custom fields related to my user in the token.
Injecting Security or TokenInterface in AccessTokenRepository doesn't seem to work, do you know how to do that ? Thanks !
Editor's reply: Try manually wiring your arguments to the repository, they are usually excluded from auto-wiring by default. See
Fantastic post & project. Thank you!
Just FYI, there's a typo here:
OAuth2UserConsetEditor's reply: Cheers buddy, corrected!
Welp got all excited as oauth is still a mystery to me, as i got your docker based client server demo going. I had a colleague help me there tho as a docker compose exec command doesnt work with the default names you had there, I also couldnt run an .sh file on the wsl2 instance in windows I did it all on.
Problem that I next hit is I'm trying to make it a SSO server for a couple of projects at work, and I cant test run getting moodle ( open source learning app) to talk to it as moodle complains about it not being https and thus likely to be in kahutz with alien spies. Then of course I hit another wall as your images are non standard and I get hives from trying to modify docker, let alone try to get it to use tls.
Can you advise; or do i need to find another project or what. my issues stem from the fact that there is data pertinent to this project in your docker containers so i cant just jump on vanilla.
Am old so change scares me.
Editor's reply: I'm struggling to make sense of this one, unfortunately, as you're not telling me exactly what's going wrong for you when you follow the instructions on the project repo to get started with Docker. To run the
.shfile, you would need to give it executable permission i.e.chmod +x, or just copy and paste the contents in to your terminal. The Dockerfiles I provide do not use TLS, you'd need to set that up yourself or run the sample project via something like the Symfony local server which will set up TLS for you. If you don't want to use Docker, the sample code repo also has manual (non-Docker) setup instructionsData-wise, to create an app client in your own project, you would use the console commands included in the League bundle, in particular
league:oauth2-server:create-clientThanks for this very helpful tutorial, I was struggling with official documentation. About the JWT embedded data, is this really useful ? I don't see the point here instead of performing a call on a dedicated api once we have the bearer. Could you tell us more ?
Editor's reply: Hi Joseph, so in terms of the OAuth2 standard, you're quite right that the only thing you should do as a client with an access token is treat it as an opaque bearer token to call an API on the resource server. But maybe your resource server isn't the same system as your authorization server, so a structured token in the form of a JWT means the resource server can now verify the token and determine the resource owner and authorized scopes without making any further inquiries or database lookups itself. Or maybe you're building an OIDC-like service or something similar where you want clients to be able to parse and read data from the token you send them. This might be the case, for example, in federated internal systems where you're not exposing your OAuth2 server to wider 3rd parties who need to rely on you providing a strict, standards-compliant implementation.
Hi Joseph, TBH I found only your tutorial on oAuth using Symfony and used the same for one of the project. I successfully installed the library and also able to generate the JWT token but currently our app server already have the Custom authentication system where bearer token is not the JWT. So whenever I try to access the separate api to for user detail, app server reads the information from the cookies not the Authorization header. Can you guide me how I can use bearer token for authorization for a particular api.
Editor's reply: I don't know who Joseph is, but in answer to your question, you need to make sure your API endpoints are configured under a separate, stateless firewall as per the section of this tutorial titled "Configure the firewall"
Hi Dave,
Very nice tutorial. I followed your description and set-up the user table with the uuid column in MySQL. However I have an issue with the app_api_test route. When it comes to check the support on authenticator for this route then the SELECT statement fails with User not found. The Select statement contains the Guid of the User but the database contains the uuid in binary format.
Can you pls. advise?
Thanks, Klaus
Editor's reply: It's possible Symfony just doesn't yet support MySQL 8's native UUID type (my demo application uses SQLite which stores UUIDs as text anyway), I'd suggest changing the column storage to varchar on the User entity and searching by text representation rather than binary in
loadUserByIdentifier.The following issue I found on Doctrine's repo (though UUID support is a Symfony feature, not a Doctrine one) indicates the binary format is probably not supported yet:
Hi Dave, Shouldn't the relation between oauth2_user_consent and oauth2_client be ManyToOne? Otherwise no consents for other users and the same client can be stored in the database.
Editor's reply: It should be and I've said as much in the tutorial on this page, but you're correct the sample code on GitHub had a typo, I've updated it. Cheers!
Hello dave, thanks for this tuto. I have a question can I add the user informations in the jwt like email or role. I have to set the email in jwt AccessToken ? but how ? Thanks in advance
Editor's reply: This is covered in the part of the tutorial headed "Override the bundle AccessToken entity", you can see there I've added a custom claim to the JWT.
I would like to express my immense satisfaction upon finding your tutorial. I was truly impressed by the clarity of the explanation and the exemplary functionality of the provided code. It was crucial in helping me understand the oauth2-server and oauth2-server-bundle libraries and their features, enabling me to implement them in my project without difficulties.
Now, I am ready to proceed with the implementation of openid connect, and I am confident that your tutorial will be equally valuable in this stage. I would like to thank you for investing your time and effort in creating this resource. It has undoubtedly significantly reduced the time required for me to understand and implement the code.
The "steverhoades/oauth2-openid-connect-server" project, available at , already appears to have support for OIDC. Do you have any suggestions on how to use it with the oauth2-server-bundle? Alternatively, could you recommend any other alternatives? Additionally, I would need support for the "offline_access" scope.
Editor's reply: I've never used the library you mention so am unable to advise on that. It is possible just using the League bundle and the broad techniques described in this tutorial to build an OIDC-compliant server, since the OIDC part only really mandates certain claims are returned in the ID token in response to certain scope grants. You probably need to override parts of the bundle to correctly handle refresh tokens with the OIDC offline_access scope though.
Hi Dave, Thank you for the tutorial.
I've been following it until the CallAPI of the client. I got 401 Unauthorized. How can I check the header passed by the client? Thanks!
Editor's reply: Hi Carl, thanks for your question. I would typically suggest using a tool like Postman to inspect and control request headers.
Hello Dave, first of all, thanks for this blog. I have hardly found this one. I have followed this code to implement the oauth2 server in my Symfony app, I followed all the necessary steps and went through to your GitHub repo but I didn't know why my /authorize with query params route redirects me to the not-found. can you please suggest to me where I am lacking? I would really appreciate your efforts and precious time.
Editor's reply: Hi Zinal, I'm afraid I don't really have enough information from you there to be able to help. The
authorizeendpoint is defined by the League bundle; did you follow the step to import the bundle's routes inside youconfig/routes.yaml?I am very grateful that I came across this article, and I thank you for it. I have a question more related to the configuration part. My stack is: an API written in Symfony 4.4, JWT issued by LexikJWTAuthenticationBundle. The front-end is built with VueJs. I need to implement the SSO part using OpenId Connect in this application. For this, on the OAuth server side (Okta), I need to create an application and provide the client (my app) with client_id and client_secret. Each customer uses a separate instance of the application I'm working on. In this context, does it make sense for me to create one OAuth2/OIDC application and use it for all instances of the application? Or should I let customers create their Okta applications and add client/secret IDs to the Sass application I distribute to them? In my mind, it was clear that I should create the application, but one of our customers came with the requirement that they create the application, and it has left me puzzled.
Editor's reply: Thanks for your comment, Patrick. In OAuth2/OIDC lexicon, a client is an application which wants to access a resource owner's data. In your case, then, sounds like Okta is your authorization server checking passwords and issuing the tokens but you have multiple clients, i.e. multiple applications in different places/businesses sharing the same user pool, is that right? If so, yes typically each of those applications would have its own client ID and secret configured in the auth server along with their list of authorized redirect URIs. You can build this either with a login page hosted by Okta or your own centralized SSO application which interfaces with Okta on the backend. Hope that answers your question, if not leave another comment with further details and I'll see if I can help further. This is the architecture that typically makes sense if you have a number of connected applications or websites where users should be able to sign in to any with the same credentials.
Dave, thank you for the quick response. My scenario is a bit different, and I'm adding more details here. The company I work for has a Sass application. Each of our clients has a separate instance of the application (different server) without the applications communicating between each other. It's solely theirs. I would like to add "Connect with Okta" on the login page of the Sass application. However, it's not clear to me whether I need to create the Okta application to obtain client_id and client_secret used in the authentication process or if I should let the customer create their Okta application and add the client ID/secret to their Sass application provided by us.
In the end, is that client ID and client secret directly tied to the Okta organization of the customer? Or what exactly is it? Any advice or additional resources would be appreciated.
Editor's reply: Hi Patrick, yes so client ID and secret are tied to a specific application (client) in Okta. It sounds like you probably want a separate application configured for each instance of your SAAS product with a separate user pool for each one. Been a while since I used Okta but I think you can configure Connections (what Okta calls a pool of users) on a per-app basis, i.e. you can create and enable a separate user database for each application, as well as enabling social sign ins (connect with Google etc.) Whether you would manage all applications under a central Okta account or allow your clients to provide you with their own client ID, secret and tenant domain and they manage their own Okta account and application is a separate decision.
Hats off to the article. I've managed to add OIDC upon your implementation and further I have a question. What approach do you recommend for implementing SSO with OIDC (including refresh token)? Some pre-build bundle, or custom implementation? Although I'm a bit hesitant about the latter option because the specs are quite extensive.
Editor's reply; Thanks for the question. There's no one-size-fits-all approach with IDAM, unfortunately. Most of the time, when you've reached the scale of requirements to warrant a robust SSO solution, you're probably better off going with off-the-shelf solutions like Cognito, Okta or Forgerock. This is particularly true if you need to federate users from a variety of legacy sources. On the other hand if you're building out a new system which is to act as an identity provider serving OIDC tokens to external services, you might find a slimmed, custom solution is adequate and less costly.
Hi, this post is amazing, i only have one problem, i configured my config\packages\lauage.....yaml like you, but when i want to create an user with php bin\console make:user, i get an error 'Only one persistence method can be configured at a time.'
Editor's reply: Hi Vince, sounds like you need to comment out one of the lines in your league configuration YAML file. You can only use one persistence provider, which for this tutorial should be Doctrine, so comment out or delete the in_memory line, e.g.
Leave a Comment